Tag Archives: Sally Hansen

Sally Hansen Mermaid’s Tale

Sally Hansen Mermaid's Tale ManicureNothing says Friday like a little glitter! Last Friday I was looking around for a Friday night manicure and came across Mermaid’s Tale. I was planning on wearing a nude and neon green dress so a dark manicure was definitely in order. 

Back in the late spring I spotted Sally Hansen’s summer 2013 Under the Sea shade collection display at Walgreens. I love blues for summer so I was excited about this collection. I ended up with Mermaid’s Tale and Black and Blue

Mermaid’s Tale has large blue and green glitter as well as smaller, dark blue glitter suspended in a blacked blue jelly base. Completely gorgeous. 

The formula is ok. Granted, it’s a glitter polish so I wasn’t expecting amazing. Using Mermaid’s Tale alone I need three to four coats to get an opaque enough color. I prefer to use it over another polish. 

Below the jump there are swatches of Mermaid’s Tale alone, swatches over butter LONDON Royal Navy as well as a few shots in the sun.

Alli


Continue reading

Sally Hansen Salon Effects Cut It Out

Sally Hansen Salon Effects Cut It Out 4If you follow TDV on Facebook or Twitter then you are probably already aware that I went to the beach last weekend. I had a wedding to attend on Saturday night so we decided to make a long weekend of it. Since I discovered Sally Hansen Salon Effects they are my go to in terms of prepping my nails for vacation. The last thing I want to think about while I’m at the beach is my manicure!

I picked up Cut It Out sometime last summer but never got around to wearing them. Considering black and white is a huge trend for spring it seemed like the perfect time to give Cut It Out a go.

Cut It Out is a black and white floral design with no shimmer what so ever. I really do love this design. It’s simple yet eye catching plus it matches almost anything. So many people complimented me on my nails at the wedding! Plus, this design really does make for perfect beach nails.

Applying and removing Sally Hansen Salon Effects strips is super simple. I did an entire post on tips and tricks of application and removal here if you are interested.

I did do something a bit different with these. I wanted to try curing real nail polish strips with a gel top coat. I used my Sally Hansen mini LED lamp and Sally Hansen Gel Top Coat. While this may have minimized the tip wear slightly these Salon Effects wear so well on their own I’m not sure curing them with a gel top coat really does much good (plus, the gel top coat makes it much more difficult to remove).

Below the jump there are a slew of additional swatches including my nails on day 6 (you can see them on day 4 here).

Alli


Continue reading

Sally Hansen Insta-Gel Strips Wine Not

Sally Hansen Insta-Gel Strips Wine NotAs many of you know I am a huge fan of the Sally Hansen Salon Effects line. Genius product, wears wonderfully, easy to apply. Can’t say enough good things. When I learned Sally Hansen was coming out with a version of their nail polish strips just in gel, instead of regular polish, form I was pretty excited.

These Wine Not Insta-Gel Strips were included in my Sally Hansen Insta-Gel Strips Starter kit though they can also be purchased separately ($15.99 MSRP). Color wise, the Wine Not strips are a classic deep red with shimmer. The color is lovely although fairly basic.

Included with the 16 strips is a nail file and cuticle stick. The application instructions for the Gel Strips are the same as the Salon Effects. I did an entire post on applying polish strips so I’m not going to rehash that here. If you’re interested in that please check out this post.

Applying these strips was a challenge. The strips are thick making them seem more like nail stickers than gel strips. My guess is this is due to the gel base coat that has been worked into these strips.

Due to the thickness of these strips it was difficult to get the strips flat on the nail. Unfortunately, even after adding the top coat and curing the strips under the LED lamp, the places where the strips did not lay flat peeled off very easily.  I didn’t get 2 days out of these strips, never the less 2 weeks!

In the future I will definitely be sticking with the original Salon Effects. I can always add a gel top coat and cure that manicure to extend the wear even more!

There are a couple more swatches below the jump!

Alli

The product(s) used in this post were provided to TDV for review. For more information check out our disclosure policy.

Continue reading

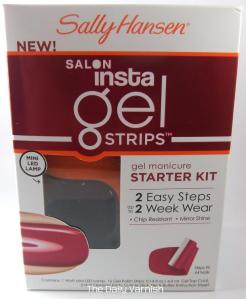
Sally Hansen Insta-Gel Strips Starter Kit

Sally Hansen Insta-Gel Strips Starter KitI have to applaud Sally Hansen for consistently being on the front end of alot of big nail polish trends whether it be nail polish strips or magnetic polish or in this case gel polish. Several years ago the idea of doing a gel manicure at home wasn’t on most people’s radar. But now there are many at home gel options though they are all still on the expensive side which makes me appreciate even more what Sally Hansen has done with this kit. I was definitely excited to give this a try!

Sally Hansen’s Insta-Get Strips Starter Kit runs around $30 and contains everything you need to do an at home gel manicure (for comparison, most of these kits are $50+).

For all the details on this kit and my thoughts on the products check out my review below the jump!

Alli

Continue reading

Sally Hansen Complete Salon Manicure So Much Fawn (+ Adele’s Golden Globe manicure!)

Sally Hansen Complete Salon Manicure So Much FawnThis is the second polish I’ve tried from Sally Hansen’s relaunched Complete Salon Manicure line. The other, Copper Penny, was a glitter top coat so this is the first normal (if you will) polish I’ve tried and I must say I’m impressed.

So Much Fawn has been part of the Sally Hansen line for ages. It was originally released years ago in the Salon line (the polishes in the square bottles…like Rose to Occasion) and while I’m sure the formula has gone through many changes the color has remained the same. It is a warm salmon pink creme with a slight yellow undertone. The color is lovely, though bad for my cool skintone. If you have a warm or olive skintone this would be a wonderful neutral to have as part of your collection.

The formula is fantastic. If I was careful this could have easily been a one coater (really!) but I used two in my swatches.

Adele wore this polish to the 2013 Golden Globes (topped with Copper Penny). The combination of the two polishes is gorgeous! Though again, not awesome for my skintone. There are swatches below the jump 🙂

Alli

The product(s) used in this post were provided to TDV for review. For more information check out our disclosure policy.

Continue reading

Sally Hansen Complete Salon Manicure Copper Penny

Sally Hansen Copper PennySally Hansen’s Complete Salon Manicure line went through a complete overhaul earlier this year. All of the old colors were retired and Sally Hansen released a slew of new polishes. When I saw the promo image for Copper Penny I was almost sold. When I saw Copper Penny in the bottle….I was definitely sold!

Copper Penny is a lovely glitter polish that contains both small and large copper glitter in a clear base. It’s definitely a top coat only type of glitter. I used 2 coats in my swatches and clearly it’s not really wearable alone.

To wear this I layered it over Ulta Snow White (just a plain white creme) and really loved the results. There are swatches of that below the jump!

The “new” Sally Hansen Complete Salon Manicure is popping up in drugstore. I saw a display at the CVS near me recently.

Alli

The product(s) used in this post were provided to TDV for review. For more information check out our disclosure policy.

Continue reading

Sally Hansen GEM crush Big Money

Sally Hansen GEM crush Big MoneyI’m a total sucker for neutral glitter. This is well chronicled thanks to OPI Spark de Triomphe. So when I picked up the Sally Hansen GEM crush holiday mini set Big Money was the glitter I was most excited about.

Big Money contains small cool toned gold glitter along with sparse larger lilac glitter suspended in a clear base. The combination is lovely, and as far as glitter polishes go, the application was relatively trouble free. I did need three coats to get an opaque color, but the formula wasn’t thick or difficult to work with like Bling-tastic also from the GEM crush line.

While this polish is lovely, I didn’t like it on me on its own (plus all of the GEM crush line polishes have wear issues unless layered over another polish). So I added it as an accent on my ring finger when I was wearing butter LONDON Royal Navy. The combination was lovely, and layering Big Money over a navy polish added  so much dimension to the polish. There are swatches of that below the jump.

Because I have (and love) OPI Spark de Triomphe this isn’t a polish I think I’ll get much use out of. But, if you don’t have a neutral glitter in your collection and are looking for a drugstore option this would be a fantastic polish to fill that void 🙂

Alli

Continue reading

Sally Hansen GEM crush Bling-tastic

Sally Hansen GEM crush Bling-tasticSparkly!

This is the second Sally Hansen GEM crush polish I have tried. I picked up a super cute mini set a couple of months ago and am slowly working my way through the polishes.  Lady Luck didn’t overly impress me but I was optimistic about Bling-tastic. It just looked so pretty in the bottle!

Bling-tastic is a dense chunky light blue glitter with more sparse even larger silver glitter in a clear base. The polish itself is gorgeous. The application was a headache.

Perhaps it’s because the glitter is chunkier but I had difficulty applying this polish. The glitter got clumpy and the formula was goopy. Just not a very pleasant experience. The fact that I needed at least 3 coats didn’t help the situation, either.

Even after a top coat, the finish of this polish wasn’t near as smooth as Lady Luck. It was very rough, even after several coats of top coat.

As I did with Lady Luck, I will definitely be trying this layered over another polish. But right now I just feel like it’s a less awesome version of OPI Absolutely Alice.

Make sure to check out the additional swatches below the jump!

Alli

Continue reading

Perfect Pair: OPI Merry Merry & Sally Hansen GEM crush Lady Luck

OPI Merry Merry Sally Hansen Lady LuckAh! I love this manicure! And it’s perfect for the holidays.

I was really excited about Sally Hansen Lady Luck. In the bottle it looked to be the perfect holiday glitter. But on the nail I didn’t love it. It was kind of dull and gritty. I knew I wanted to give it a try over another polish. OPI Merry Merry seemed like the perfect candidate. It has a similar base color and already has some shimmer going on.

Over 2 coats of Merry Merry I applied just one coat of Lady Luck and it turned out amazing! Using just one coat of Lady Luck fixed the dull and gritty problem of wearing it on its own.

The entire time I was wearing this manicure I couldn’t stop looking at my nails. That is a sign of a great manicure.

There are more swatches of this lovely manicure below the jump 🙂

Alli


Continue reading

Sally Hansen GEM crush Lady Luck

Sally Hansen GEM crush Lady LuckThe Sally Hansen GEM crush line hit stores over a year ago. While the display looked lovely as did the polishes I never tried any of the them. They are a bit pricey for drugstore glitter polishes so when I saw Sally Hansen had a mini set called Happy Manicure for just $4.99 out for the holidays I decided to give the line a shot.

The set includes 4 mini GEM crush polishes; Big Money, Be-Jeweled, Bling-tastic and Lady Luck. In the bottle Lady Luck looked to be the most perfect holiday glitter there ever was. With the holidays just around the corner I decided to try Lady Luck first.

Lady Luck is dark pink leaning red and larger sparse holographic glitter suspended in a clear base. Sally Hansen claims polishes from this line are full coverage glitters so I was expecting fairly dense glitter. As it turns out….the formula isn’t overly dense but does provide full coverage in 3 coats.

Despite being a full coverage glitter polish I don’t love this polish on its own. It eats top coat like crazy. Even after several thick coats of clear polish the finish was still rough and not as shiny as I’d like. Due to this I will be using this polish only as a top coat in the future.

As always there are more swatches blow the jump (make sure to check out the macro shot…it’s gorgeous!).

Alli


Continue reading