
 I have to applaud Sally Hansen for consistently being on the front end of alot of big nail polish trends whether it be nail polish strips or magnetic polish or in this case gel polish. Several years ago the idea of doing a gel manicure at home wasn’t on most people’s radar. But now there are many at home gel options though they are all still on the expensive side which makes me appreciate even more what Sally Hansen has done with this kit. I was definitely excited to give this a try!
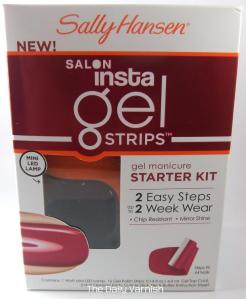
Sally Hansen’s Insta-Get Strips Starter Kit runs around $30 and contains everything you need to do an at home gel manicure (for comparison, most of these kits are $50+).
For all the details on this kit and my thoughts on the products check out my review below the jump!

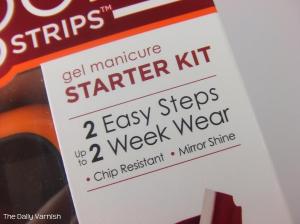
Packaging: The packaging for this kit is very basic. It’s just a box that contains the mini LED lamp and everything else you need to do a gel manicure. There are very basic instructions on the side of the box as well as the claim that doing a gel manicure using the kit is easy and your manicure can last up to 2 weeks.
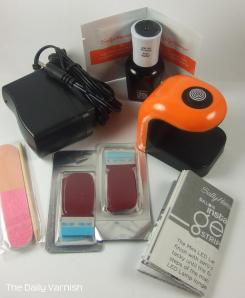
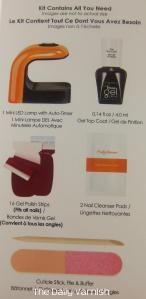
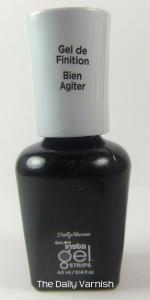
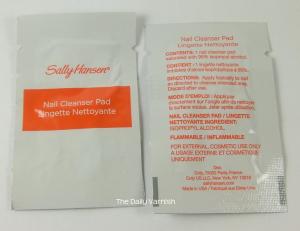
Contents: The kit includes a mini LED light and wall adapter, .14oz Sally Hansen Gel Top Coat (for reference the .5 oz OPI Gel Top Coat is $34), 16 Gel Polish Strips (my kit included the color Wine Not….these retail for $15 alone), 2 nail cleaner pads, a nail file and cuticle stick. A detailed set of instructions is also included.
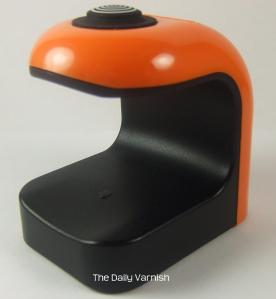
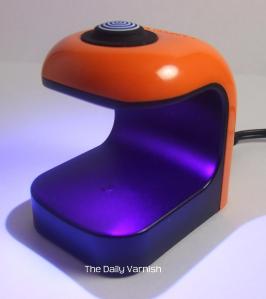
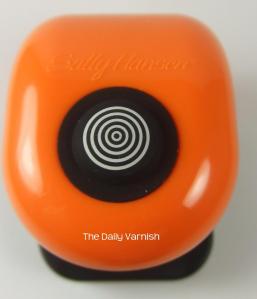
The lamp: The mini LED lamp is the most important thing in this kit. This is what you use to cure the gel manicure. Pros: Easy to use. Just push the button in top of the lamp and leave the nail being cured under the lamp until it automatically turns off 30 seconds later. And of course the price. Cons: Because it is a mini lamp only one nail can be cured at a time (this doesn’t bother me but is worth pointing out). The lamp cannot be left plugged in because the button stays lit constantly.
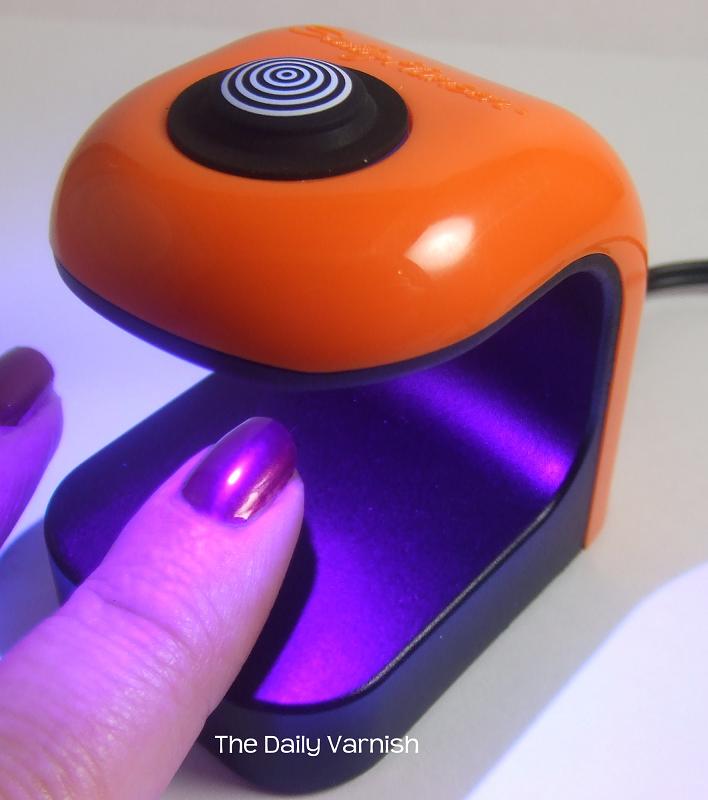
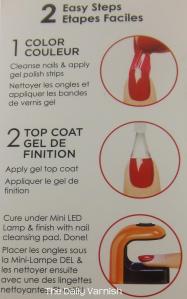
The actual manicure: Doing a gel manicure using the Sally Hansen Insta Gel Strips is exactly the same as using their Salon Effects line just with an added step.
- Start by preping the nail (shape, push cuticles back, make sure nails are clean and free of oils).
- Next pick the strip that best fits each nail.
- Apply the strip molding it to the nail.
- Remove the excess using the provided nail file
- Apply the gel top coat one nail at a time and cure the nail under the lamp.
- After curing the nail it will still be sticky. Remove this residue using the provided nail cleaner wipes (or just a cotton round and rubbing alcohol).
Done!
Removal is fairly easy. Using an acetone based remover and my method of nail polish removal worked perfectly.
Additional info: This lamp can be used to cure any gel polish that requires an LED light. The included gel top coat can also be used on top of other nail strips (including Sally Hansen Salon Effects) to extend wear. I’m going to do a separate review on the Insta Gel Strips but to say the least, I don’t really like them. I’d definitely stick to the Salon Effects or a nail strip like OMG Nail Strips.
Overall I’m happy with this kit despite not liking the Insta Gel Strips. The lamp and gel top coat make it worth the price.
The product(s) used in this post were provided to TDV for review. For more information check out our disclosure policy.


can you use the gel topcoat to extend the wear time of regular nail polish?
Yep!
I find it odd there is all this yesterday and again today news feeds and on TV about the skin cancer danger of gel nails but they are referring to the UV lamp ones. Most places and all the home kits are using LED lamps now and I think the news is really not clear to folks about gel manis. Not one story I have read or heard talked about the difference between the old UV cure and the newer LED cure lamps.
To answer Chris’s question above, I have used the lamp and gel top coat and cured regular nail polishes that way. I tend to get 7 days out of regular polishes that way and far less chipping or tip wear.
I am not however a fan of this product because it depends on finding or having a supply of the gel strips which I find really limited in colors right now and also never been great at getting them on to fit some of my really odd shapped fingernails. I have 2 that genetically are mutants! One side of the end of the bed is way lower than the other side.
Most gel systems have switched over to LED lights so it really doesn’t make any sense why people are outraged now by UV lights!
You don’t have to use the strips with this system (I never again will use the gel strips….I hated them). It’s a fantastic deal price wise to get an LED lamp home, though.
I’ve really been pining for this system ever since it started popping up at Walgreens and Ulta because I’ve always been curious about gel nails and I trust Sally Hansen to make a good product. I think I’m definitely going to ask for one of these for my birthday or Christmas this year. Now the only problem is that I have a hard time going more than 2 days with the same manicure. Oh well, I guess I’ll just have to use it when I go on vacation.
I have the same problem! I’m always wanting to change my manicure. It’s nice to have this around, though, when I really do need my manicure to last for a long time 🙂
Pingback: Sally Hansen Insta-Gel Strips Wine Not | The Daily Varnish
Pingback: Essie Sleek Stick Over the Moon | The Daily Varnish
I’m still so ambivalent about the whole gel nail system…since I do tend to like to change my polish at least weekly…but my curiosity is making it hard to not want to try it!
I have the same problem. I change my polish almost everyday! But this is a great thing to have around if you know you’re going to have a busy week or are going on vacation 🙂
Pingback: Sally Hansen Salon Effects Cut It Out | The Daily Varnish
Awesome, thanks for this review!
I recently bought this kit myself. How long do you think that 0.14 oz bottle of gel top coat might last? It’s an opaque bottle so I can’t tell how quickly I’m going through it. I’ve already used it once for the nail strips that came with it, but I look forward to using it as a top coat for everything.
I’m not sure. I’ve used this top coat now 4 or 5 times and it doesn’t feel like it’s getting empty but the opaque packaging really doesn’t do anyone any favors!
Thanks for the quick response! That’s good to know. Also, I just used this kit two nights ago and so far it looks good, but I have to wonder: how long have you found this gel top coat lasts compared to regular and/or quick-dry top coats? Does it matter what it’s worn on top of?
I’ve only used this over nail polish strips. I haven’t used it over just regular nail polish. I’ve been told this extends the wear of regular polish quite a bit but I have no personal experience with that.
The only caveat for using a gel top coat over a regular polish is that the polish has to be COMPLETELY dry.
That’s how I intend to use it too. I tried L’Oreal strips recently and they seem to last as long as polish on me. The whole reason I’m experimenting with gels and strips lately is that I have an infant now (my first), which makes it difficult to carve out the dry time needed for a traditional manicure. So it’s either this or bare nails, and I was getting soo tired of those.